“This Is a Big One!” The First Descendant 1.2.10 Update Is Finally Here, and It’s Huge
- Mar 13 2025
- Mar 13 2025

The wait is over. The First Descendant 1.2.10 Update has finally arrived, bringing Serena, Photo Mode, Sigma Sector, and new weapons, and that is just scratching the surface. The players have been excited about this update for a while now, hoping that it will help bring TFD out of a rut. So, let’s see what this update has in store for us.
The First Descendant 1.2.10 Update Patch Notes
On March 13, Nexon released the long-awaited update for The First Descendant. It moves the narrative forward into Season 2 Episode 2, called “Beyond the Void”. It also adds a ton of improvements and new content, which are as follows:
Main Quest: Sigma Sector

- During the <Sigma Sector main quest>, completing the <Basics Training for Descendants> allows you to check the <List of Major Battlefields during the Apocalypse> in a record.
- If you investigate all traces of the Early Descendants listed in this record, you will receive a special Chest Attachment.
New Content: Sigma Sector Dropoff Operation
- Sigma Sector has been restricted for a century due to the strong Void Erosion phenomena there. In a land where nothing was thought to survive, now traces of the enemy have been found.
Penetrate the powerful Void Storm and find out what’s going on in Sigma Sector.
- Sigma Sector Dropoff Operation becomes available after completing the main quest ‘Responsibility, Regret, and Atonement.’
- The features of Sigma Sector Dropoff Operation are as follows:
- A new field, Sigma Sector, is added.
- Sigma Sector features a new type of monsters from the Legion of Immortality, the Defects.
- Sigma Sector consists of two zones, Broken Boundary and Isolated Desert, with two difficulty levels, Normal and High-risk, based on the Storm Level.
- One of the four missions for each zone and difficulty level is randomly selected and carried out.
- Reaching Mastery Rank 15 and completing an Isolated Desert mission unlocks Broken Boundary on High-risk Difficulty.
- Completing a Broken Boundary mission on High-risk Difficulty unlocks Isolated Desert on High-risk Difficulty.
- Defeating certain monsters in Sigma Sector will drop Sigma Sector exclusive unique weapons, Ground Custodian.
- When you acquire a Ground Sweeper, you can deal more damage to enemies or destroy the enemy’s giant transport ships more effectively.
- During the Sigma Sector main quest, you can earn the following rewards that will help your Descendant:
- Upon completing ‘Operation Unbelievable’: 1 Energy Activator, Nimble Fingers +5, Skill Expansion +5, HP Amplification +5
- Upon completing ‘Ultimate Troublemaker’: Electric Condense +5, Focus on Electric +5, Focus on Singular +5
- Upon completing ‘Fix What We Broke’: Contagion +5, Focus on Toxic +5, Focus on Tech +5
High-Value Relic Exchange
- You can visit Reina in Albion to exchange High-Value Relics obtained from Sigma Sector Dropoff Operations for various items.
- Unlocked when you reach Mastery Rank 15 and complete an ‘Isolated Desert’ mission.
How to Obtain High-Value Relics
- Today’s Bonus is available once a day per zone in the Sigma Sector on High-risk Difficulty.
- You can obtain 1 High-Value Relic for today’s bonus, with a maximum of 2 per day.
- Today’s Bonus rewards become available when you unlock the Arche Tuning System.
Exchangeable Items
- Unique Arche Factor EXP Boost 15% (1-Hour)
- Unique Arche Factor EXP Boost 15% (5-Hours)
- Unique Arche Factor EXP Boost 15% (3-Days)
- Equipment Slots +1 (Purchase limit of 100)
- Storage Slots +1 (Purchase limit of 100)
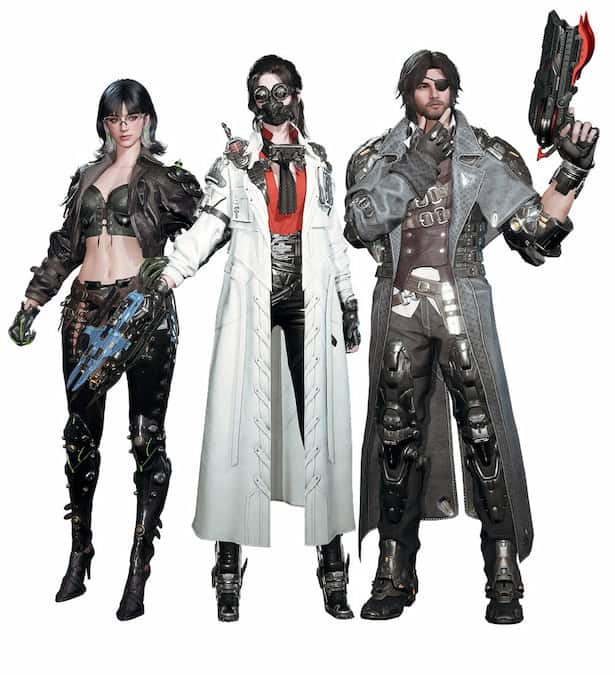
New Descendant: Serena

- Added a new Descendant, Serena Antonietta.
- You can acquire Serena’s blueprints, codes and materials from Sigma Sector Dropoff Operations.
Serena’s Skills
- Passive: Divinity
- Serena receives bonus stats when in midair.
- Active 1: Sacred Flame
- Fires flames in the direction of the crosshair, dealing damage and inflicting Repentance on enemies and granting Blessing to allies.
- Penetrates terrain when used on the ground and explodes on contact with the ground when used in midair.
- Repentance deals continuous damage and reduces the enemy’s Fire Resistance, and firearm attacks against enemies inflicted with Repentance have a chance to recover Rounds for the firearm in use.
- Blessing heals Serena for a percentage of her Max HP every second.
- Active 2: Ascension
- A toggle skill that drastically reduces gravity when used and grants various effects depending on the Rounds when attacking with a firearm in midair.
- However, using it adjusts the Grappling Hook cooldown and Jump.
- General Rounds: Increases Multi-Hit Chance and Multi-Hit Damage.
- Special Rounds: Deals AoE firearm damage to nearby targets based on the firearm damage dealt.
- Impact Rounds: Recovers MP on a critical hit.
- High-Power Rounds: Has a chance to deal additional Fire skill damage.
- Active 3: Soar
- When used on the ground, Serena soars high into the air. When used in midair, she moves quickly in the input direction.
- When used in midair, holding down the skill key makes her move for a certain period of time.
- Additionally, using the skill reloads the currently equipped weapon and resets the number of her Jumps.
- Active 4: Redemption
- When used on the ground, grants Prayer of Redemption to Serena and nearby allies.
- When used in midair, grants Redemption’s Judgment to Serena.
- Prayer of Redemption significantly reduces incoming damage for a certain number of hits, and recovers HP and MP when the effect is removed.
- Redemption’s Judgment deals powerful additional AoE damage to the surrounding area based on Serena’s HP when she attacks with a firearm.
Skill Modules
- Skill Module 1: Divine Surge (Active 4)
- Quickly flies forward and inflicts Knockdown on collision, and deals large amounts of damage on landing.
- Creates Purifying Blaze along the path and inflicts Repentance on targets hit.
- Repentance deals continuous damage and reduces the enemy’s Fire Resistance, and firearm attacks against enemies inflicted with Repentance have a chance to recover Rounds for the firearm in use.
- When used in midair, the angle of movement is adjusted in the direction of the crosshair.
- Skill Module 2: Hymn (Active 3)
- When used on the ground, Serena soars high into the air and leaves a Hymn of Exaltation on the ground, which increases the Jump of all allies within range.
- When used in midair, Serena moves and grants Hymn of Vitality to nearby allies, increasing their Movement Speed.
- Additionally, using the skill reloads the currently equipped weapon and resets the number of her Jumps.
External Components
- Added new External Components.
- New External Components can be obtained from Sigma Sector
| Name | Set | Effect Description |
| Ascending Armory | 2-piece Set | Skill Cost -6.5% |
| 4-piece Set | When reloading in mid-air, provides Supply Bullets (Cooldown 10s) Field Supplies +10% Intercept Battle Supplies +10% | |
| Sprinting | 2-piece Set | Grappling Hook Charge Time -10% |
| 4-piece Set | When using skill, grants 1 stack of Agile (Up to 1 stack, duration 30s) Agile: Movement Speed +10% | |
| Crusader Knights | 2-piece Set | Chill Resistance +6% |
| 4-piece Set | Grants max stacks of Heavy Armor and each received hit removes 1 stack (Up to 5 stacks, cooldown 15s, effect cooldown after equipping/unequipping 5s) Heavy Armor: Incoming Damage Modifier -21% When hit, has a 10% chance to grant Purification to self (Cooldown 10s) | |
| Unpredictable | 2-piece Set | No Effect |
| 4-piece Set | Grants Unpredictable (Cooldown 60s, effect cooldown after equipping/unequipping 10s) Unpredictable: Randomly grants Resilience, Latent Strength, or Fierce Attack Resilience (Duration 10s) HP Recovery proportional to Max HP, and at full HP, Shield Recovery proportional to Max Shield Continuous Health Recovery +4.8% Continuous Shield Recovery +3.3% Latent Strength (Duration 20s) Skill Power +21% Skill Cost -12% Fierce Attack (Duration 30s) Firearm ATK +25% Reload Time Modifier +8% |
Module Settings Implant System
- Added the Module Settings Implant System, which allows the transfer of Module Settings applied to the Normal Descendant to the Ultimate Descendant.
- Transferring to the Ultimate Descendant requires the Photonic Implanter.
- The Max Capacity UP and assigned Module Socket Types of the Normal Descendant can be transferred to the Ultimate Descendant as is.
- This means that both Energy Activator and Crystallization Catalyst applications are transferable.
- However, the assigned Socket Type is implanted into the same slot position, and the initial Module type of a standard Descendant is not implanted.
- After the implant, the Normal Descendant loses the Max Capacity UP and assigned Module Socket Types.
- However, any duplicate Max Capacity UP and assigned Module Socket Types applied to both Normal and Ultimate are returned as Consumables.
Arche Tuning System
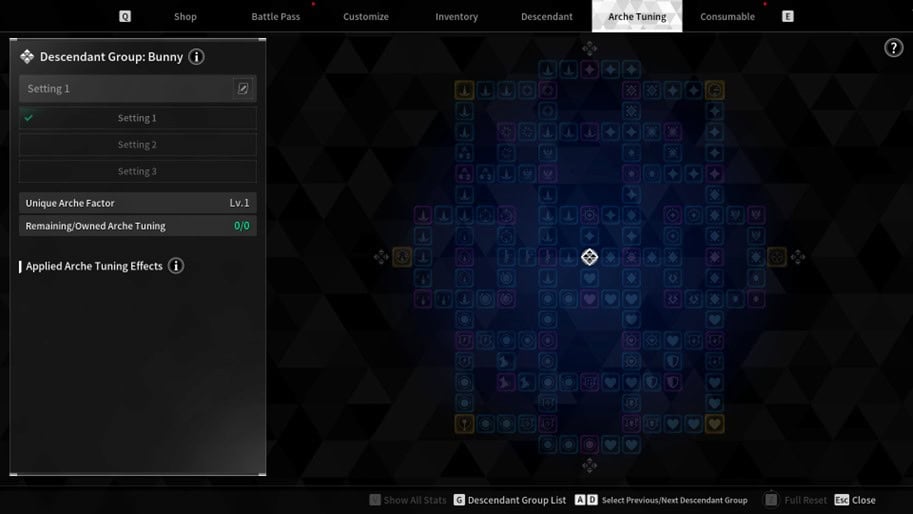
- Added the Arche Tuning System that enhances your Descendant’s abilities.
- The system unlocks when you complete the main quest ‘Into the Storm.’
- A sub quest is available to help you understand the Arche Tuning features.
- Using the system requires Arche Tuning, which is acquired when your Unique Arche Factor level increases.
- You can increase your Unique Arche Factor level by obtaining and accumulating.
- Unique Arche Factor EXP can be obtained from various content.
Where to Obtain Unique Arche Factor EXP
- Normal Sigma Sector
- High-risk Sigma Sector
- Mission of the Day: High-risk Sigma Sector
- Void Erosion
- Void Vessel: Hard
- 400% Infiltration Operation
You can access the Arche Tuning System via the menu in the Inventory or at the Prime Hands.
- The Arche Tuning status is shared per Descendant Group, and the effects are also applied equally.
- Only the same Descendants (Normal, Ultimate) are treated as a single Descendant Group.
- For a Descendant Group with only the Normal Descendant, both the Normal and Ultimate will be treated as a single Descendant Group when the Ultimate is added later.
- Arche Tuning consists of multiple Nodes.
- Each Node has a Tier, and the value of a Node’s applied effect is dependent on its Tier.
- Nodes require Arche Tuning to activate, and cannot be activated without it.
- You can start activating Nodes that are closest to the Tuning Starting Point.
- The Nodes that can be activated are applied with a separate effect, allowing you to discern which Nodes can be activated.
- You can only activate Nodes that are adjacent to an activated Node.
- Activated Nodes can be reset.
- You can reset each individual Node, or all Nodes at once through Full Reset.
- Resetting returns the Arche Tuning used for activation.
- Loadouts and Presets are available.
- A total of three loadout slots are provided.
- Added a dedicated slot for Arche Tuning within Presets.
- Saved as a loadout activated at the time Preset was saved.
Special Operation Hard Difficulty Map Changes
- The map for Special Operation Hard Difficulty has been updated.
- Resource Defense: Echo Swamp → Fortress
- Mine Blockade: The Sterile Land → White-night Gulch
- The EXP granted in each middle section of Special Operations on Hard Difficulty has been removed or reduced, and the same amount has been added to the EXP rewards for defeating monsters in each wave.
- The chances of earning rewards for defeating monsters have been adjusted due to the change in the number of monsters.
- The total EXP earned remains the same or is slightly higher than before.
Content Leaderboards
- Added a leaderboard to Void Intercept Battle (Abyss).
- You can check it on the Intercept Start screen and the Results screen of Void Intercept Battle (Abyss).
- The Void Intercept Battle (Abyss) Leaderboard ranks players by clear time.
- The Void Intercept Battle (Abyss) Leaderboard will be reset as follows:
- Reset start time: UTC+0 2025.03.13 (Thu) 07:30 ~ 2025.04.17 (Thu) 07:30
- Reset cycle: 10 weeks (70 days)
- The reset cycle for the Void Erosion Purge Leaderboard will change as follows:
- Reset start time: UTC+0 2025.03.13 (Thu) 07:30 ~ 2025.04.17 (Thu) 07:30
- Reset cycle: 5 weeks (35 days)
Four New Ultimate Weapons
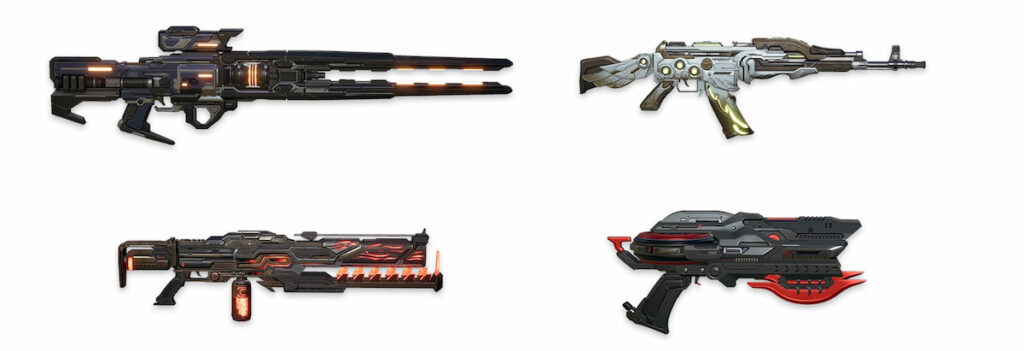
Malevolent (Hand Cannon)
- Acquirable from Battle Pass.
- Unique Ability: Malicious Pain
- Hitting an enemy creates a Bladed Cog.
- The Bladed Cog bounces between multiple enemies, dealing damage.
- Hitting a Weak Point creates additional Bladed Cogs.
Truly Deadly Arson (Beam Rifle)
- Blueprints, codes, and materials can be obtained in Sigma Sector (Normal)
- Unique Ability: Double Tap, Double Check
- Hitting an enemy inflicts Void Fire.
- When a Burn-related effect is inflicted, Void Fire explodes, dealing damage and transforming Burn to a more powerful effect, Inferno.
- Inferno nullifies Void Fire.
- Only Fire ATK applies to this weapon.
- Other Attribute ATKs are converted to Fire ATK at a certain ratio.
Ancient Knight (Assault Rifle)
- Blueprints, codes, and materials can be obtained in Sigma Sector on High-risk Difficulty.
- Unique Ability: Descending Judgment
- Reloading in midair grants Float.
- Increases ATK Drop-off Starting Distance and ATK Drop-off Ending Distance.
- Hitting an enemy procs HP recovery.
- When multi-hit triggers in midair, grants Atonement.
- Multi-Hit Damage increases for each stack of Atonement.
- Reloading in midair grants Float.
- Float and Atonement are removed when you touch the ground.
A-TAMS (Sniper Rifle)
- Blueprints, codes, and materials can be obtained in Sigma Sector on High-risk Difficulty.
- Unique Ability: Electronic Arche Infusion
- When aiming, continuously consumes MP to fill the gauge.
- When firing, deals increased additional damage based on the filled gauge.
Weapons
- Capped the Fire Rate of weapons at 2000.
- Added a new stat, Multi-Hit Damage.
- Each firearm has its own value, which may vary.
Void Intercept Battle

- You can now check Battle Info in the Intercept Battle Entrance UI.
- The Battle Info page provides information about the stats and battle tactics of the Colossus.
Void Intercept Battles (Abyss): Tormentor
- The Colossus in the Void Intercept Battle (Abyss) has been changed to Tormentor.
- To intercept Tormentor, you must reach Mastery Rank 18 and clear the ‘The Most Powerful Colossus’ quest.
- Tormentor
- The Tormentor is an Electric-attributed Colossus.
- The Tormentor spawns Plasma Cubes.
- Plasma Cubes are difficult to destroy with normal attacks.
- Plasma Cubes are vulnerable to continuous damage.
- When the Tormentor enters the Void Reflux mode, it creates a thunderstorm to press the field.
- Take advantage of the Tormentor’s vulnerability by actively utilizing Toxic attacks.
Photo Mode
- Added Photo Mode.
- Photo Mode is accessible through the ESC menu and can also be entered via the shortcut feature on the ring menu.
- There are no restrictions on the use of the Photo Mode feature, but it will be forcibly terminated in situations such as DBNO / death / teleport / map movement.
- You can select a pre-designated preset when entering Photo Mode.
- Presets are pre-selected shooting options for the Photo Mode, and even if you don’t select a specific preset, you can set the Photo Mode options to achieve the same effects as the preset.
Preset Configuration
- Default: The default settings for Photo Mode
- Portrait: Ideal for taking portraits, applying depth of field and blurring the background.
- Background: Ideal for taking background photos, allowing you to capture a sharp shot of the entire screen.
- Load Previous Settings: You can apply the last settings you used as it. They are saved when you exit Photo Mode.
Photo Mode Options Info
| Category | Option Name | Featured Details |
| Camera | Camera Movement Method | Select how you want the camera to move. You can choose between Free Move and Track Move. |
| Field of View | You can specify the camera’s field of view. Lowering the value zooms in, and raising the value zooms out. | |
| Screen Tilt | You can tilt the camera. | |
| Apply Depth of Field | Select whether to apply the depth of field. | |
| Applied Intensity | Select the degree to which the depth of field is applied. The higher the value, the stronger the background blur effect. | |
| Aperture | Select the aperture opening level of the camera. The higher the value, the wider the area in focus, and the lower the value, the narrower the area in focus. | |
| Focal Lenght | The focus will be at a specified distance from the camera. The lower the value, the closer the focus is, and the higher the value, the farther away the focus is. When the value is 0, the background blur effect is not applied. | |
| Subject | Show Fellow | Select whether to show your Fellow. You can choose among View All / View My Fellow Only / Hide All. |
| Change Descendant Pose | Change your Descendant’s pose. You can choose one of the Solo type emotes that you have available. | |
| Rotate Descendant | Your Descendant rotates on a fixed position. Rotates only on the Z axis. | |
| Post Processing | Brightness | You can change the screen brightness. |
| Contrast | You can change the screen contrast. | |
| Shrapness | You can change the screen sharpness. | |
| Vignetting Strenght | Change the visibility of the outer periphery of the screen. The higher the value, the narrower the visible area. | |
| Film Grain Size | You can change the size of film grain. If the film grain intensity is low, it may not be visible regardless of the film grain size. | |
| Film Grain Intenstiry | You can change the intensity of film grain. If the film grain size is small, it may not be visible regardless of the film grain intensity. | |
| Color Fringing | You can set it as if you are looking through a prism. The higher the value, the stronger the effect. |
- The Photo Mode does not support separate filming functions. Please use the filming function provided by your platform.
Customization Loadout System
- Added a customization loadout system.
- You can set different customizations for each loadout slot.
- Three customization loadout slots are provided by default, and up to two slots can be purchased additionally.
- You can change the customization loadout slots in the Customize menu and the Inventory.
- However, the customization loadout slots can only be purchased in the Customize menu.
Eyebrows and Beard Dye Feature
- Added a feature that enables dyeing your Descendant’s eyebrows and beard.
- You can dye eyebrows and beard using hair dye items.
- A color that has been used is saved to that Descendant, and is available to dye eyebrows and beard slots freely afterward.
- Only the Descendants with beards can dye their beards.
Fellow

- Added a new Fellow, Vespers Hunting Dog.
- You can acquire blueprints, codes, and materials for the Vespers Hunting Dog from the Void Vessel Hard Difficulty.
- Hagios Sheepdog research material can be obtained in Void Vessel (Normal).
- If Hagios Sheepdog was set as a Target Reward in Void Vessel (Hard) before the update, progress will no longer increase. Please reset your Target Reward accordingly.
Interact
- You can interact with the new Fellow. Enjoy the diverse aspects of the Fellow.
Growth
- Fellow can acquire EXP through Enhancement Items and “Level Up” with it.
- Enhancement Items can be acquired with research blueprint and materials from Void Vessel.
Owned Abilities
- Grant Module Drop Chance Increase Modifier.
- The stats increases gradually per the growth.
- Item Auto Pickup: Automatically pickup items in the Consumable and Inventory within a certain range.
- The “item recognition range” increases gradually per the growth.
- Auto-Dismantle Items: Periodically dismantle items that the Descendant acquired. Dismantling is performed when Inventory is full of items.
- Items for Dismantling are selected per the “Exclude from Junk” setting.
- Auto Refill Rounds: Automatically refills the Rounds for using weapon at regular intervals.
- As the Fellow grows, the “Auto Refill Rounds Cycle” gradually improves.
- Changed the abilities of the existing Fellow, Hagios Sheepdog.
| Previous | Changed |
Grant Module Drop Chance Increase Modifier. -The stats increases gradually per the growth. Item Auto Pickup: Automatically pickup items in the Consumable and Inventory within a certain range. -The “item recognition range” increases gradually per the growth. |Auto-Dismantle Items: Periodically dismantle items that the Descendant acquired. Dismantling is performed when Inventory is full of items. -Items for Dismantling are selected per the “Exclude from Junk” setting. | Grant Module Drop Chance Increase Modifier. -The stats increases gradually per the growth. Item Auto Pickup: Automatically pickup items in the Consumable and Inventory within a certain range. -The “item recognition range” increases gradually per the growth. Auto-Dismantle Items: Periodically dismantle items that the Descendant acquired. Dismantling is performed when Inventory is full of items. -Items for Dismantling are selected per the “Exclude from Junk” setting. Auto HP Recovery: The Fellow automatically heals the Descendant every 30 seconds. -As the Fellow grows, the Auto HP Recovery amount gradually increases. |
- The chances of obtaining blueprints and codes for the Fellow in the Void Vessel have been changed to be the same regardless of whether you have the Fellow equipped.
- Equipping the Fellow increases the chances of obtaining blueprints and codes for Keelan and Ines as before.
Inversion Reinforcement
- Some of the more useful Inversion effects have been retained, while the effects of some others have been changed.
- Aggressive items have been added along with the existing defensive items and achievement conditions were eased so that you can select items to situations.
| Category | Previous (Season 2) | Changes and Adjustments (Season 2 Episode 2) |
| Hunt 1 | Biodensity Augmentation When defeating an enemy, grants Biodensity Augmentation Biodensity Augmentation: Max HP +11.7% for 30s (up to 5 stacks) | Neural Focus Augmentation When defeating an enemy, grants Neural Focus Augmentation Neural Focus Augmentation: Max MP +0.8% for 30s (up to 5 stacks) |
| Hunt 2 | Shield Particle Augmentation When defeating an enemy, grants Shield Particle Augmentation Shield Particle Augmentation: Max Shield +8.1% for 30s (up to 5 stacks) | Strike Point Amplification On landing multi-hit with a firearm, grants Strike Point Amplification Strike Point Amplification: Weak Point DMG +9% for 30s (up to 3 stacks) |
| Hunt 3 | Neural Focus Augmentation When defeating an enemy, grants Neural Focus Augmentation Neural Focus Augmentation: Max MP +0.4%, MP Recovery Modifier +1.5% for 30s (up to 5 stacks) | Ammo System When landing a Firearm Critical Hit, grants Ammo System Ammo System: Reload Time Modifier +5% for 30s (up to 5 stacks) |
| Hunt 4 | Inversion Particle Augmentation When defeating an enemy, grants Inversion Particle Augmentation Inversion Particle Augmentation: DEF +8.6% for 30s (up to 5 stacks) | Arche Circulation Tactic On hitting an enemy with a Skill, grants Arche Circulation Tactic Arche Circulation Tactic: Skill Cooldown -24% for 10s (Cooldown 30s) |
| Hunt 5 | Enhanced Pain Suppression When an Augmentation effect is active, grants Enhanced Pain Suppression Enhanced Pain Suppression: Incoming Damage Modifier -4.1% | Area Burst Inducer On hitting an enemy with a skill or a firearm, inflicts Area Burst Inducer on the target and all enemies within 7m Area Burst Inducer: Incoming Damage Modifier +13% for 10s (Cooldown 30s) |
| Recovery 2 | Selective Neurostimulation Grants one of the following 3 effects every 45s Mental Stimulation = 60% chance to recover MP by 12.4% of Max MP Highly Focused 30% chance to recover MP by 21.7% of Max MP Release Unconsciousness = 10% chance to recover MP by 27.9% of Max MP and HP by 7.2% of Max HP | Rolling Defense When Rolling, has a 70% chance to recover 4% of Max Shield |
| Recovery 3 | Recovery Maneuver When using Grappling Hook grants Recovery Maneuver Recovery Maneuver recovers Shield by 3% of Max Shield every 0.1s while using Grappling Hook (max 30% recovery) (Cooldown 25s) | Selective Neurostimulation Grants one of the following 3 effects every 45s -Mental Stimulation = 60% chance to recover MP by 12.4% of Max MP -Highly Focused = 30% chance to recover MP by 21.7% of Max MP -Release Unconsciousness = 10% chance to recover MP by 27.9% of Max MP and HP by 7.2% of Max HP |
| Recovery 4 | Heightened Sensory Cells When an enemy is nearby, grants Arche Harmony every 0.5s Arche Harmony lasts for 10s. When Max Stack is reached, recover HP by 20% of Max HP and MP by 8.5% of Max MP (up to 4 stacks) (Cooldown 25s) | Probabilistic Recovery System When obtaining HP and MP Recovery Orbs, has a 50% chance to recover 11% of Max HP and 5% of Max MP |
| Survival 3 | Vitality Burst When defeating an enemy, inflict Vitality Burst Vitality Burst: HP Recovery Modifier +3.1% and Shield Recovery Modifier +2.1% for 30s (up to 1 stack) | Shield Particle Augmentation When defeating an enemy, grants Shield Particle Augmentation. Shield Particle Augmentation: Max Shield +8.1% for 30s (up to 5 stacks) |
| Survival 4 | Abyss Enhancement When defeating an enemy, inflict Abyss Enhancement Effect Abyss Enhancement: Incoming DMG Modifier -0.5% and Grappling Hook Charge Time -6% for 30s (up to 5 stacks). | Biodensity Augmentation When defeating an enemy, grants Biodensity Augmentation Biodensity Augmentation: Max HP +11.7% for 30s (up to 5 stacks) |
| Survival 5 | Enhanced Arche Potential When obtaining HP and MP Recovery Orbs, grants Enhanced Arche Potential Enhanced Arche Potential: All Attribute Resistance +123 (up to 10 stacks) | Crisis Response System When obtaining HP and MP Recovery Orbs, grants Crisis Response System Crisis Response System: DEF +8.6% (Up to 5 stacks) |
| Season 2 | Photon Stacking Grant Photon Stacking on hitting 3 or more enemies with Voltia Weapon Photon Stacking: Firearm ATK +12.8% and Beam Rifle Charging Speed +16% for 10s Changing weapons removes Photon Stacking (Cooldown 20s) | Evolutionary Cutting Mechanism When using Malevolent, grants Evolutionary Cutting Mechanism Evolutionary Cutting Mechanism: Number of Bladed Cogs created on hit +2 When changing weapons removes Evolutionary Cutting Mechanism |
| Season 3 | Explosive Forging When changing Hammer and Anvil to Anvil mode, grants Explosive Forging Explosive Forging: Shell Capacity +13%, Skill Cost -6% for 10s Changing weapons removes Explosive Forging (Cooldown 20s) | Risk Mitigation Protocol During Void Erosion Purge, grants Risk Mitigation Protocol. Risk Mitigation Protocol: Incoming Damage Modifier – 5% |
| Season 4 | Arche Boost Grant Arche Boost on hitting 5 or more enemies with the skill Arche Boost: Skill Cooldown -15.5%, Skill Speed & Range Increase Modifier +11% for 7s (Cooldown 25s) | Aerial Maneuvering Raider When airborne for at least 2s, grants Aerial Maneuvering Raider Aerial Maneuvering Raider: Multi-Hit Chance +18% (When not airborne, Aerial Maneuvering Raider is removed) |
Module
- Added new groups of Rare Firearms, “Multi-Hit Damage” and “Multi-Hit Chance.”
- Combine modules in the “Multi-Hit Damage” group and “Multi-Hit Chance” group to implement additional Firearm Damage according to the Multi-Hit Chance when attacking with firearms. Firearm DMG implemented by Multi-Hit Chance is determined by Multi-Hit Damage.
- Added Modules related to Multi-Hit in Ultimate tier Firearm Modules to expand the range of options you can choose from to add synergistic effects with Multi-Hit settings.
- Added Modules can be obtained through Sigma Sector, Void Intercept Battle (Hard), Void Intercept Battle (Abyss) and Combine Modules.
| Category & Tier | Module Group | Name | Description |
| General Rounds (Rare) | Multi-Hit Chance | Multi-Percussion Sight | Multi-Hit Chance +30%, Firearm Critical Hit DMG -120% |
| General Rounds (Rare) | Multi-Hit Chance | Multi-Trigger Rifling | Multi-Hit Chance +40%, Fire Rate -30% |
| General Rounds (Rare) | Multi-Hit Damage | Multi-Piercing Sights | Multi-Hit Damage +70%, Firearm Critical Hit DMG -120% |
| General Rounds (Rare) | Multi-Hit Damage | Multi-Piercing Trigger | Multi-Hit Damage +30%, Multi-Hit Chance +10% |
| General Rounds (Ultimate) | Special Mod | Multi-Hit Induction | On hitting Weak Points, Multi-Hit Chance +5.7% for 5s (up to 10 stacks, -2 stacks per failed Weak Point Attack) |
| General Rounds (Ultimate) | Battle Proficiency | Multi-Bullet | On landing multi-hit, Multi-Hit Damage +5% for 3s (up to 3 stacks) and inflicts Deep Wounds on the target hit. Deep Wounds inflict 3% of Firearm DMG at regular intervals for 3s (up to 3 stacks) |
| General Rounds (Ultimate) | Battle Proficiency | Multi-Sights | When using Singular skill, Firearm ATK +4% for 15s with a 100% chance, and using Fusion skill Multi-Hit Damage +14% for 15s with a 100% chance (up to 3 stacks, these effects are stackable) |
| General Rounds (Ultimate) | Battle Proficiency | Multi-Processor | When using Dimension skill, Weak Point DMG +3% for 15s with a 100% chance, and using Tech skill Firearm Critical Hit DMG +8% for 15s with a 100% chance (up to 3 stacks, these effects are stackable) |
| General Rounds – Assault Rifle (Ultimate) | Battle Proficiency | Multi-Amplification | When inflicting a debuff, Multi-Hit Chance +4% for 15s (up to 3 stacks) |
| General Rounds – Assault Rifle (Ultimate) | Battle Proficiency | Multi-Circulation | When granting a buff or using a Recovery Skill on allies, Multi-Hit Damage +16.8% for 15s (up to 5 stacks) |
| Special Rounds (Rare) | Multi-Hit Chance | Multi-Percussion Sight | Multi-Hit Chance +40%, Firearm Critical Hit DMG -90% |
| Special Rounds (Rare) | Multi-Hit Chance | Multi-Trigger Rifling | Multi-Hit Chance +60%, Fire Rate -15% |
| Special Rounds (Rare) | Multi-Hit Damage | Multi-Piercing Sights | Multi-Hit Damage +85%, Firearm Critical Hit DMG -90% |
| Special Rounds (Rare) | Multi-Hit Damage | Multi-Piercing Trigger | Multi-Hit Damage +35%, Multi-Hit Chance +15% |
| Special Rounds (Ultimate) | Special Mod | Multi-Hit Induction | On hitting Weak Points, Multi-Hit Chance +5.7% for 5s (up to 10 stacks, -2 stacks per failed Weak Point Attack) |
| Special Rounds (Ultimate) | Battle Proficiency | Multi-Bullet | On landing multi-hit, Multi-Hit Damage +4% for 3s (up to 3 stacks) and inflicts Deep Wounds on the target hit. Deep Wounds inflict 3% of Firearm DMG at regular intervals for 3s (up to 3 stacks) |
| Special Rounds (Ultimate) | Battle Proficiency | Multi-Sights | When using Singular skill, Firearm ATK +4% for 15s with a 100% chance, and using Fusion skill Multi-Hit Damage +12% for 15s with a 100% chance (up to 3 stacks, these effects are stackable) |
| Special Rounds (Ultimate) | Battle Proficiency | Multi-Processor | When using Dimension skill, Weak Point DMG +3% for 15s with a 100% chance, and using Tech skill Firearm Critical Hit DMG +5% for 15s with a 100% chance (up to 3 stacks, these effects are stackable) |
| Special Rounds (Ultimate) | Special Mod | Compressed Thermal Round | Hitting an enemy 3 times in a row with a firearm attack from a distance of 20m or more deals 78% of Fire ATK as additional damage |
| Special Rounds (Ultimate) | Special Mod | Compressed High Voltage Round | Hitting an enemy 3 times in a row with a firearm attack from a distance of 20m or more deals 78% of Electric ATK as additional damage |
| Special Rounds (Ultimate) | Special Mod | Compressed Venom Round | Hitting an enemy 3 times in a row with a firearm attack from a distance of 20m or more deals 78% of Toxic ATK as additional damage |
| Impact Rounds (Rare) | Multi-Hit Chance | Multi-Percussion Sight | Multi-Hit Chance +25%, Firearm Critical Hit DMG -60% |
| Impact Rounds (Rare) | Multi-Hit Chance | Multi-Trigger Rifling | Multi-Hit Chance +65%, Fire Rate -15% |
| Impact Rounds (Rare) | Multi-Hit Damage | Multi-Piercing Sights | Multi-Hit Damage +65%, Firearm Critical Hit DMG -60% |
| Impact Rounds (Rare) | Multi-Hit Damage | Multi-Piercing Trigger | Multi-Hit Damage +20%, Multi-Hit Chance +15% |
| Impact Rounds (Ultimate) | Special Mod | Multi-Hit Induction | On hitting Weak Points, Multi-Hit Chance +5.7% for 5s (up to 10 stacks, -2 stacks per failed Weak Point Attack) |
| Impact Rounds (Ultimate) | Battle Proficiency | Multi-Bullet | On landing multi-hit, Multi-Hit Damage +6% for 3s (up to 3 stacks) and inflicts Deep Wounds on the target hit. Deep Wounds inflict 3% of Firearm DMG at regular intervals for 3s (up to 3 stacks) |
| Impact Rounds (Ultimate) | Battle Proficiency | Multi-Sights | When using Singular skill, Firearm ATK +4% for 15s with a 100% chance, and using Fusion skill Multi-Hit Damage +16% for 15s with a 100% chance (up to 3 stacks, these effects are stackable) |
| Impact Rounds (Ultimate) | Battle Proficiency | Multi-Processor | When using Dimension skill, Weak Point DMG +3% for 15s with a 100% chance, and using Tech skill Firearm Critical Hit DMG +5% for 15s with a 100% chance (up to 3 stacks, these effects are stackable) |
| High Power Rounds – Shotgun (Rare) | Multi-Hit Chance | Multi-Percussion Sight | Multi-Hit Chance +50%, Firearm Critical Hit DMG -50% |
| High Power Rounds – Shotgun (Rare) | Multi-Hit Chance | Multi-Trigger Rifling | Multi-Hit Chance +55%, Fire Rate -15% |
| High Power Rounds – Shotgun (Rare) | Multi-Hit Damage | Multi-Piercing Sights | Multi-Hit Damage +120%, Firearm Critical Hit DMG -50% |
| High Power Rounds – Shotgun (Rare) | Multi-Hit Damage | Multi-Piercing Trigger | Multi-Hit Damage +25%, Multi-Hit Chance +15% |
| High Power Rounds – Sniper Rifle (Rare) | Multi-Hit Chance | Multi-Percussion Sight | Multi-Hit Chance +30%, Firearm Critical Hit DMG -50% |
| High Power Rounds – Sniper Rifle (Rare) | Multi-Hit Chance | Multi-Trigger Rifling | Multi-Hit Chance +55%, Fire Rate -15% |
| High Power Rounds – Sniper Rifle (Rare) | Multi-Hit Damage | Multi-Piercing Sights | Multi-Hit Damage +50%, Firearm Critical Hit DMG -50% |
| High Power Rounds – Sniper Rifle (Rare) | Multi-Hit Damage | Multi-Piercing Trigger | Multi-Hit Damage +15%, Multi-Hit Chance +10% |
| High Power Rounds – Launcher (Rare) | Multi-Hit Chance | Multi-Percussion Sight | Multi-Hit Chance +40%, Firearm Critical Hit DMG -50% |
| High Power Rounds – Launcher (Rare) | Multi-Hit Chance | Multi-Trigger Rifling | Multi-Hit Chance +60%, Fire Rate -15% |
| High Power Rounds – Launcher (Rare) | Multi-Hit Damage | Multi-Piercing Sights | Multi-Hit Damage +100%, Firearm Critical Hit DMG -50% |
| High Power Rounds – Launcher (Rare) | Multi-Hit Damage | Multi-Piercing Trigger | Multi-Hit Damage +15%, Multi-Hit Chance +10% |
| High Power Rounds (Ultimate) | Battle Proficiency | Multi-Bullet | On landing multi-hit, Multi-Hit Damage +5% for 3s (up to 3 stacks) and inflicts Deep Wounds on the target hit. Deep Wounds inflict 3% of Firearm DMG at regular intervals for 3s (up to 3 stacks) |
| High Power Rounds (Ultimate) | Battle Proficiency | Multi-Sights | When using Singular skill, Firearm ATK +4% for 15s with a 100% chance, and using Fusion skill Multi-Hit Damage +13% for 15s with a 100% chance (up to 3 stacks, these effects are stackable) |
| High Power Rounds (Ultimate) | Battle Proficiency | Multi-Processor | When using Dimension skill, Weak Point DMG +3% for 15s with a 100% chance, and using Tech skill Firearm Critical Hit DMG +4% for 15s with a 100% chance (up to 3 stacks, these effects are stackable) |
| High Power Rounds – Sniper Rifle (Ultimate) | Battle Proficiency | Multi-Reload | After reload, first shot’s Multi-Hit Damage +328% (Cooldown 5s) |
Battle Pass
- A new Battle Pass has arrived.
- Battle Pass Season 2 Episode 2 – “Beyond the Void” has been added.
- New Battle Pass and Rewards in the Battle Supply Shop have been applied.
- New items are in the Bonus Shop.
- Added new Battle Pass Challenges.
- Decreased the number of Weekly Battle Pass Challenges from 8 to 6.
- Increased Battle Pass EXP that can be earned from each Weekly Challenge.
- Slightly increased the total number of Supply Coins that can be obtained from Weekly Challenges.
Events

- The new Login Event “Beyond Sigma Sector” has begun.
- Added 14-Day Login Event.
- Complete the login event to get your Reward. You can choose either Ultimate Bunny Purchase Ticket or Hailey’s Skin Box!
- Period: After the 03.13.2025 (Thu) maintenance – 06.11.2025 (Wed) 23:59 PDT
- The new Event Challenge “Assist with Serena’s Covert Operations” has begun.
- Added Daily Challenge Tasks.
- Challenge Tasks will be reset every 2 weeks.
- Don’t miss out on the 1st Challenge Tasks where you can obtain Crystallization Catalysts every day!
- Period: (1st) After the 03.13.2025 (Thu) maintenance – 03.26.2025 (Wed) 23:59 PDT / (2nd) 03.27.2025 (Thu) 00:00 – 04.16.2025 (Wed) 23:59 PDT
Shop
(1) New UI design has been applied to Shop.
- Applied special designs to key Shop categories (Featured/Popular).
- Improved the product banner ratios and designs.
- Added new components and changed existing components for new features.
- Descendant Filter button and pop-up screen
- UI to tick the View Only Available Items box
- New layout for Featured category
- Edited the layout of Popular category
- Layout changes for page displays: Added page control UI
(2) Added & changed Shop categories.
- Some categories in Shop were added and changed so that relevant products can be displayed together.
| Shop Category | Description |
| Popular | Introduce popular items |
| Faetured | Introduce featured items |
| Descendant | Introduce Ultimate Descendant and Normal Descendant products |
| Fellow | Introduce Fellow products |
| Concept Skins | Introduce Special/Seasonal/Themed Skin products |
| Premium Skins | Introduce Ultimate Descendant Skin/Premium Skin/Evolving Skin products |
| Weapon Skin | Introduce Weapon Skin products |
| Common Cosmetic Items/Attachments | Introduce Back Attachment/Chest Attachment/Spawn/Ecive/Grappling Hook/HUD Skin products |
| Make Up | Introduce various Make Up products |
| Paint | Introduce Paint products |
| Support Items | Introduce Support products |
| Caliber | Introduce products for Caliber purchases |
(4) Added Shop Convenience features.
- Descendant Filter: View products relevant to the Descendant you selected.
- View Only Available Items: You can choose the option to not display products you have already purchased or cannot purchase anymore.
- View Related Products: You can check the information on item(s) available for purchase for the currently hovered product.
(3) Added Featured function in Shop.
- Based on the purchase and play history, you will be presented with 3 featured themes.
- Description of each featured theme’s context will be provided in tooltip.
(6) Added new products.
| Main Category | Sub Category | Product |
| Descendant | Normal Descendant | Serena |
| Descendant | Normal Descendant Bundle | Serena Growth Package |
| Fellow | Fellow | Vespers Hunting Dog |
| Fellow | Fellow Bundle | Communications Support Bundle |
| Fellow | Fellow Bundle | Flight Adaptation Training Bundle |
| Fellow | Fellow Bundle | Specialized Excavation Bundle |
| Fellow | Fellow Skin | Communications Support Bodyarmor |
| Fellow | Fellow Skin | Network Detection Sensor |
| Fellow | Fellow Skin | Flight Adaptation Training Suit |
| Fellow | Fellow Skin | Flight Adaptation Training Helmet |
| Fellow | Fellow Skin | Specialized Excavation Harness |
| Fellow | Fellow Skin | Specialized Excavation Helmet |
| Fellow | Fellow Decorations | Backup Communicator |
| Fellow | Fellow Decorations | Emergency Jetpack |
| Fellow | Fellow Decorations | Relic Detection Sensor |
| Fellow | Fellow Decorations | Splish Splash |
| Fellow | Fellow Decorations | Bath Time |
| Fellow | Fellow Decorations | Guess Where? |
| Support Items | Boost | Unique Arche Factor EXP 3-Day Boost (30%) |
| Support Items | Boost | Unique Arche Factor EXP 7-Day Boost (30%) |
| Support Items | Boost | Unique Arche Factor EXP 14-Day Boost (30%) |